Tuesday, December 26, 2017

NALEDI Metal Tube Squeezer

I've talked about getting a Metal Tube Squeezer for years. It's kind of an odd thing to want. As an artist I find that I could use one for paint. As a Mother I find that I could use one for toothpaste.

Where to Get the NALEDI Metal Tube Squeezer:

You can get it on Amazon Prime for $12.99 https://www.amazon.com/dp/B06XYN79GL

It comes in a nice box that's a little bigger than a wallet.


What Can This Metal Tube Squeezer Be Used for:

  • Paint Tubes
  • Toothpaste
  • Hand creams
  • Lotions 
  • Cosmetics
  • Glues

...and anything else that comes in a tube.

How is it Used?


Put the base of the tube in the squeezer. Hold the two metal sections below tight. Start turning it with your other hand. It squeezes all the stuff in the tube to the top. It leaves no air; making the product last longer.

I pictured it two different ways. I did this on purpose. The top photo below is for left handed people. My Dad is left handed, so when I realized it could be used this way I thought I should point that out. The bottom is for right handed people like me. It's easiest to turn it with your more dominate hand. you just flip it over and can use it whatever way you'd like.


Does Everyone Need a Tube Squeezer:

No, but for me it's certainly handy! It's one of those want items. Not a need item.

I will get more paint or anything out of a tube than I ever would without the metal tube squeezer. To me that's worth it. I don't like to waist things at all!

I can use it on paint in the classroom, and at home on toothpaste. Isaak get to the bottom of the toothpaste tube, and has to have us help him every time.

Could you use a metal tube squeezer? What would you use it for?


Disclaimer: We got this product in exchange for our opinion on them. The company in no way told me what to write, or influenced me in any way.

Monday, December 25, 2017

#Snow #Angel Art Project for Kids

Merry Christmas!

Snow Angel are so pretty! I liked making them because they were fast to make. Lay down, move your arms and feet up and down, boom you have a Snow Angel.

This craft will be another one that shows up on ParentSavvy.com. It's written differently, and will have other pictures.


What You Will Need:
  • Black or Dark Paper or Foam Board
  • 2 or 3 Light Colors of Acrylic or Tempera Paint 
  • White Acrylic Paint or White Gesso
  • A Target or Walmart Plastic Bag
  • Clear Shelf Paper, or Sticky Vinyl 
  • Newspaper Protect Your Working Surface
  • A Sharp Pencil
  • Scissors 
Optional:
  • A Blow Dryer to Speed the Drying Time
  • Painter's or Masking Tape
  • An Cookie Cutter - Angel Style
Snow Angel Craft:

1: Cover your working surface to protect it. We're about to make a fun mess. 

It's not too messy, but you'll want to protect your table for sure. 

2: Wrinkle up a plastic bag, dip it in white, and hit your black or dark paper with it.


Let it dry. You may want a blow dryer handy. We used one quite a bit during this craft because Isaak and I couldn't wait for the next step.

Hit it up with another light color. Isaak used a French Grey. You can use any light color.


3: Get out the sticky vinyl or cheap-o shelf paper. 


4: We're about to make some angels. 

Roll the vinyl or shelf paper out. Draw 2 or 3 angles on there. You can use an angel cookie cutter to trace around. Isaak insisted on drawing his own.


 Cut them out, and place them on the paper. Make sure the paint is dry first!


 5: Add more paint on with a scrunched up plastic bag. Watch your angels disappear. 


Let the paint dry.

Add another coat of another light color. This time Isaak decided on a light teal.


6: Make sure the paint is dry. Peel the shelf paper up! 


End Result:

That's it. It's really that simple. You can throw the angel shelf paper pieces away, or opt to keep them like Isaak did.


Here it is:


Saturday, December 23, 2017

iKlips #iosflashdrive Review

I just got iKlips II 32GB USB 3.1 to review. It's a Lightning Flash Drive. 


What it's Used For:

  • External Memory Storage
  • Transfers Images From One Device to Another

It's for Apple, iPhone, iPad, Mac, iOS, Android & PC. It will not work on Kindles.


Store:

Extended Connector fits with any case. Each port has a cover. It has a USB connector: Mini for my iphone and a normal size for my computer.


App:

It pops up a free app. This is how awkward I am with apps: I had no idea what I was doing. Travis had to tell me what to do. He was giving me the stink eye as I was doing each step. As if to say, Really Alissa! I'm on my computer all the time. I find no desire to mess with extra apps.

The first time I loaded it I didn't click on the right option, so I couldn't get images off the device. I had to remove the app, and put it back up again.

So If you're me you'll find their app a pain. If you're like my husband you'll find it to be easy peasy.

In the end there was success.


I did read some negative reviews. You can only put about 4 images on it at a time. That's kind of annoying if you're a photographer that works with a lot of images at a time. I consider myself to do that. In some ways I'd just rather email myself images, and get them from my email.

Will I use it as my as I thought I would? Probably not. It seems handy though. 

Where to Buy it:

https://www.amazon.com/s/ref=nb_sb_noss?url=me%3DA3MHPFDGCAZAER&field-keywords=ios+flash+drive%2C+B0784FJ3QV

Cost: 

$42.97

What do you store your photos on? 

Disclaimer: We got this product in exchange for our opinion on them. The company in no way told me what to write, or influenced me in any way.

Friday, December 22, 2017

Random Tid Bits

  1. Has it snowed where you live? The first day of winter hit, and boom it finally snowed in Omaha, Nebraska. We need the moisture so bad! I just don't want it to stay dry, the dryness effects the farmer's crops, and food prices go through the roof. That's just the kind of thinking I do. Do I love snow? I could take it for about 5 minutes. I guess I don't mind snow, I just hate bitter cold wind. What do you dislike about winter?

    It's also horrible on allergies if the ground doesn't freeze.

     
  2. I'm excited today to learn that I won a screen printing kit from speedball art. That's one form of art I've never tried. The only printing I've done is a block print. 


  3. Tis the season for people in your family not getting along. I'm stuck in the middle of a few. I love them, but want to scream, "STOP!" 

  4. I had 1 drop in my first year class, and one not pass a class. I had 1 drop in my third year class, and two not pass my class.

  5. I decided to go ahead and try and treat my cyst once again.


    Long story on that:

  6. Me for a few weeks with a hot compress on my forehead! I wish this freaking cyst on my forehead would just flipping go the flip away! I’ve had it for awhile now. I’ve tried apple cider vinegar, which just burned my skin, and made it look worse. I tried going to a Dermatologist, which told me he couldn’t remove it because it’s by nerves, and my face could be paralyzed.  Now I’m trying one hot pack after another, and bread poultice at night. So far nothing. I see a #surgeon in Feb if I can’t get this stupid thing to go away. Anyone have any advice besides taking an X-acto knife to my face?

Wednesday, December 20, 2017

#Snowman #Craft

This is a craft that will go up on ParentSavvy.com 

I have a little story to tell about that. The people at ParentSavvy.com are super nice! They get me a check soon after I've finished a craft. I love making crafts with Isaak.

I met with a person from there. She told me that I'd be writing once a month, and told me to come up with a list of ideas. I came up with 2 lists, and let her choose. We decided I'd just go with the first list, and do the 2nd list the next year. I thought I was supposed to do everything on the list. It was a lot! I was knocking out a few crafts at a time.

She just emailed me this week, reminding me that I only have to do 1 a month. I'm so far ahead that I'd be writing for March. Needless to say, if I do anymore crafts with Isaak they have to be spring related.

Travis said, "I was wondering why you were doing so many crafts. I remembered it was 1 a month." I emailed her back explaining that I thought I had to do the whole list we agreed on, and that I was glad she let me know that we were into March. I swear sometimes I have an Amelia Bedelia brain. Meaning I just think differently. Example: Amelia Bedelia was told to draw the drapes, and she actually drew on them with markers.

I don't know if it's the right brain side of me, if I just take people too literally, or what. I can tell you that my posts for ParentSavvy.com are very detailed. She wasn't at all annoyed with me. I'm just glad we're on the same page now.

Anyhow onto Making a Snowman:


Has it snowed where you live? It hasn't here in Omaha, Nebraska.

I love snowmen. Anyone can get into making a snowman! It doesn't matter what you believe, or don't believe. Making a snowman is fun for all.

First:

Get a set of foam balls with 3 different sizes, and something flat to use as a base. We used a flat circle foam piece.


Here's Isaak with them all. We kind of mocked it up, so you can see what we're about to make.


Second:

Make a carrot nose. 

I had some cookie dough left, and put it on a toothpick to bake with the cookies. You could use Sculpey, or some other baked clay. 


Sand it  down:


Third:

Paint it orange. A little acrylic paint goes a long way!


This is all I mixed up:


Fouth:

Plug in the hot or cold glue gun.

It was Isaak's first time using a glue gun. He was super excited. 


Fifth:

Use wooden toothpicks and hot glue to secure each styrofoam ball.

For the carrot nose, trim the toothpick with a fingernail trimmer. 


Sixth:

Get stick pins to give your snowman eyes and a mouth.


Seventh:

Add some buttons with hot glue.


Eighth:

Make a scarf with scrap fabric, or felt. It doesn't have to be fancy. I just cut a strip out. Then stick pinned it to Frosty's neck.


Ninth:

Make a hat. 

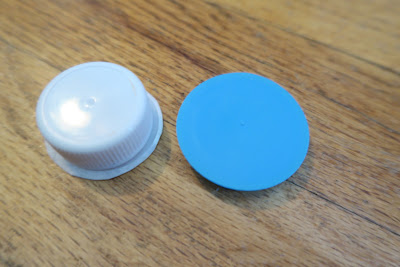
We collected ahead of time some milk, and other caps. I used a milk cap, and an almond milk cap. 

Fill the bigger one with hot glue - most of the way. Put it on Frosty's head. Then add some more hot clue into the next lid to add that one. 


Tenth:

Add arms. I had Isaak go outside to collect 2 tiny sticks. We only ended up using 1 by breaking it in 1/2. Since I had sandpaper out, I sanded the ended to poke into the middle foam ball. First I added hot glue to the pointy ends to ensure they would stay. 


Eleventh:

We tore apart some cotton balls, squirted hot glue on the base, and added the snow. You could use spray glue to add white glitter. 


My favorite picture!


Twelveth:

Paint the top section of the hat black. If you have trouble with your paint sticking add a drop of hand soap to the acrylic paint.


Isaak loved it! He's wanted to take all our crafts to school to show his school. This one I wouldn't let him. It's a bit fragile. I think it will hold together well. Just not when it's in a backpack shaking around. 

When was the last time you made a snowman? 

Disclaimer

The opinions on this blog are my personal take on products and topics relating to motherhood. This blog is a personal blog written and edited by me.

I am not compensated to provide opinions on a variety of topics. The views and opinions expressed on this blog are my own. If I claim to show knowledge of certain topic or product I will only endorse products or services that I feel, based on my expertise, are worthy of such endorsement.

If you have any questions about this blog, or want to get in contact with me please email me at: anapeladay@gmail.com